")


Introduction
StampIT! is a collection of high-quality terrain heightmaps designed for creating realistic landscapes inside Unity. Instead of sculpting mountains, cliffs, valleys, deserts, and other terrain features manually, you can "stamp" pre-made terrain shapes directly onto your Unity Terrain.
Whether you're building open-world environments, racing games, survival games, RPGs, or simulation projects, StampIT! can significantly speed up terrain creation.
What Is Terrain Stamping?
Terrain stamping is the process of applying a heightmap image onto a terrain.
Think of it like using a brush in Photoshop:
- The terrain is your canvas.
- The heightmap is your brush.
- Stamping blends the heightmap onto the terrain.
You can:
- Create mountains
- Add valleys
- Generate cliffs
- Form craters
- Build dunes and deserts
- Create islands and coastlines
Instead of manually sculpting every feature, StampIT! allows you to place professional terrain shapes with a few clicks.
Image 1 – Example of Terrain Stamping Concept


Step 1: Import StampIT! Into Unity
After purchasing or downloading StampIT!:
- Open your Unity project.
- Import the StampIT! package.
- Wait for Unity to finish importing all files.
Inside the package you'll find:
- Heightmaps
- Brushes
- Stamp collections
- Documentation
- Bonus content
Step 2: Configure Heightmap Import Settings
StampIT! heightmaps are provided in high-quality 4K resolution.
Important Setting: 16-Bit Textures
When importing heightmaps:
- Select the heightmap texture.
- Open Import Settings.
- Ensure the texture is imported as:
- 16-bit
- Uncompressed (recommended)
- Heightmap compatible
Why 16-Bit Matters
Using 8-bit textures will result in:
- Blocky terrain
- Visible stepping
- Loss of detail
Using 16-bit textures preserves:
- Smooth mountains
- Crisp terrain features
- Professional-quality landscapes
Image 2 – Heightmap Terrain Detail


Step 3: Install the Terrain Brushes
StampIT! includes preconfigured brushes.
However, the brushes are compressed inside ZIP archives.
Why Are They Zipped?
Unity Terrain Tools loads every brush into memory.
If hundreds of brushes are installed:
- RAM usage increases dramatically
- Terrain editing becomes slower
To avoid this:
- Navigate to:
StampIT!/Brushes
- Locate the ZIP archive.
- Extract the archive.
- Refresh Unity.
The brushes will now appear in the Terrain Tools palette.
Step 4: Install Unity Terrain Tools
For the best experience, install Unity's official Terrain Tools package.
Installation
- Open:
Window → Package Manager
- Search for:
Terrain Tools
- Install the latest version.
Terrain Tools adds:
- Stamping
- Noise tools
- Erosion tools
- Smoothing
- Advanced sculpting
These tools work perfectly with StampIT!.
Step 5: Create Your Own Stamp Brush
You can create custom brushes using StampIT! heightmaps.
Creating a Brush
Inside the Project Window:
Right Click
→ Create
→ Brush
Assign the desired heightmap texture.
Recommended settings:
- Shape Texture = StampIT Heightmap
- Radius Scale = Adjust as needed
- Falloff = Smooth
Falloff Settings
Falloff controls edge blending.
Low Falloff:
- Sharp edges
- Strong terrain transitions
High Falloff:
- Smooth blending
- Natural terrain integration
Image 3 – Terrain Brush Falloff Example


Step 6: Stamp Terrain
Now the fun begins.
Open Terrain Inspector
- Select your Terrain object.
- Open Inspector.
- Click:
Paint Terrain
- Choose:
Stamp Terrain
Select a Stamp
Choose any StampIT! brush.
Examples include:
- Cliffs
- Mountains
- Dunes
- Valleys
- Volcanos
- Beaches
- Islands
Adjust Settings
Before stamping:
Brush Size
Controls stamp scale.
Small Size:
- Rocks
- Small hills
Large Size:
- Massive mountains
- Entire landscapes
Height
Controls elevation.
Low Height:
- Gentle terrain
High Height:
- Extreme mountains
Opacity
Controls stamp strength.
Low Opacity:
- Soft blend
High Opacity:
- Full detail
Paint the Terrain
Click directly on the terrain.
The stamp will immediately modify the terrain shape.
You can:
- Rotate
- Scale
- Reapply
- Layer multiple stamps
This allows nearly unlimited combinations.
Image 4 – Creating Mountains and Cliffs


Step 7: Combine Multiple Stamps
The best terrains are usually made from multiple stamps.
Example workflow:
Base Layer
Use:
- Rolling Hills
- Valleys
Secondary Layer
Add:
- Rocky Plateaus
- Highlands
Detail Layer
Add:
- Cliffs
- Rocks
- Canyon features
Final Touches
Use Terrain Tools:
- Erosion
- Noise
- Smooth
This creates realistic-looking environments.
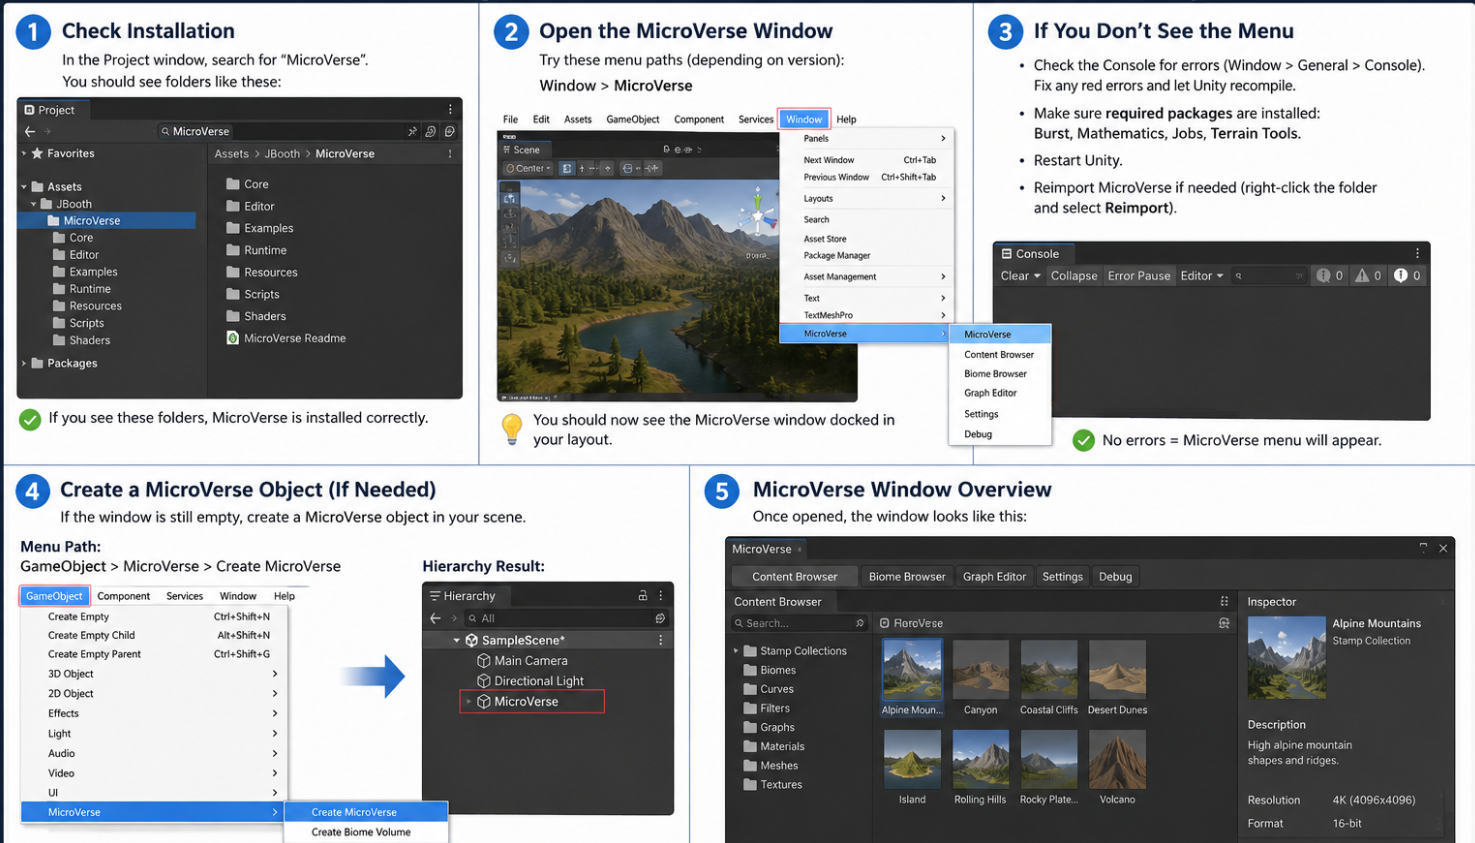
Step 8: Using StampIT! With MicroVerse
StampIT! is fully compatible with MicroVerse.
After importing:
- Open MicroVerse.
- Open Content Browser.
- Locate the StampIT! heightmaps.
No conversion is required.
The stamps become available immediately.
Benefits:
- Faster workflows
- Procedural terrain generation
- Better terrain management
Step 9: Using StampIT! With Gaia
StampIT! also supports Gaia.
Fast Method
Move the heightmaps into:
Gaia User Data/Stamps/
Example:
Gaia User Data/Stamps/Rowlan
The stamps will automatically appear inside Gaia's Stamp Browser.
Conversion Method
- Open Gaia Manager.
- Navigate:
Advanced
→ Gaia Tools
→ Scanner (Stamp Import)
- Drag StampIT! heightmaps into:
Drop Objects Here To Scan
- Click:
Save Scan
Gaia creates converted files automatically.
Generated files appear in:
Assets/Gaia User Data/Stamps/Scanner Exports
Image 5 – Open World Terrain Created with Stamps


Common Problems and Fixes
Brushes Not Showing Up
Cause:
- ZIP archive not extracted
Fix:
- Unzip the Brushes folder contents
Terrain Looks Blocky
Cause:
- Heightmaps imported as 8-bit
Fix:
- Use 16-bit import settings
Terrain Lacks Detail
Cause:
- Terrain resolution too low
Fix:
- Increase terrain heightmap resolution
- Reduce Pixel Error value
Recommended:
Pixel Error = 1–3
High Memory Usage
Cause:
- Too many brushes loaded simultaneously
Fix:
- Extract only the brush packs you need
Or:
- Use MicroVerse, which doesn't have this issue
Best StampIT! Packs for Beginners
Great starting packs include:
- Rolling Hills
- Valleys
- Alpine Mountains
- Seaside Cliffs
- Sandy Beaches
- Highlands
- Rocky Plateaus
- Tuscany Rolling Hills
These provide enough variety to build complete environments.
Final Thoughts
StampIT! is essentially a massive library of professional terrain heightmaps that lets Unity developers build landscapes in minutes rather than hours. Combined with Unity Terrain Tools, MicroVerse, or Gaia, it becomes a powerful environment creation workflow capable of producing mountains, deserts, coastlines, cliffs, islands, volcanoes, and valleys with minimal manual sculpting.
For the best results:
- Import heightmaps as 16-bit textures.
- Install Unity Terrain Tools.
- Extract only the brushes you need.
- Layer multiple stamps together.
- Add erosion and noise afterward for realism.
This workflow can take a completely flat terrain and turn it into a production-ready landscape in just a few minutes.